Translate

Sunday, March 23, 2014

IN LOVING MEMORY OF MY BROTHER JEFF

In Loving Memory Of My Brother Jeff


March 6, 1966 - March 23, 2014

My brother Jeff past away today, he was 48 years old.  He had a heart of gold and was a hard worker.  His trade was in auto body and paint, he was a highly skilled painter.   He leaves behind his wife Deborah, his children Jeffrey and Ashley, 3 grandchildren (Kayden, Payton and Riley), his mother Shelby and his sister's Patti and Beverly.  He preceded in death by his father Henry, sister Pamela and his brother Paul.  This is a very difficult time for our family as it is never easy when one looses a loved one.  I will be back soon.  

Hugs, Beverly

Thursday, March 20, 2014

BATHROOM MAKEOVER

Bathroom Makeover


More pictures below...

While we are waiting on an approval for all of us to go to Korea I decided to get busy getting the house ready to sell.  Even if we do not  all get to go to Korea as a family we will still be trying to sell our home in the near future, so it can't hurt to get started.  Our upstairs bathroom needed the most attention of any room in our home.  It is over used and abused so I decided it needed some TLC.  I chose a simple neutral palette of colors including mostly tans and shades of brown.  I wanted a simple clean look that appeals to both males and females and I wanted to stay on a tiny budget.  I will show you a breakdown at the bottom of this post. I also wanted the things I chose to go with us when we move on, so I wanted to love it as well. 

With that in mind I found a very nice shower curtain featuring a vintage Paris theme.  It features all my favorites Paris, vintage postcards and vintage perfume labels. 


To compliment the shower curtain I chose tan rugs and accent towels.  I gave you a sneak peak at my towels in my previous post.  The towels and rugs are all by Better Homes and Gardens and I loved the color.  I felt the towels needed something special so I added a very nice crochet and ribbon trim to a bath towels hand towel and wash cloth.  

When I purchased my towels they looked like this...


I added the trim and here they are after...


 I love how they turned out...


  I do not really like those carpet type toilet covers and I think they are unsanitary as well.   So I also made a cute burlap doily for the back of the toilet.  I added the same crochet trim to the doily. 


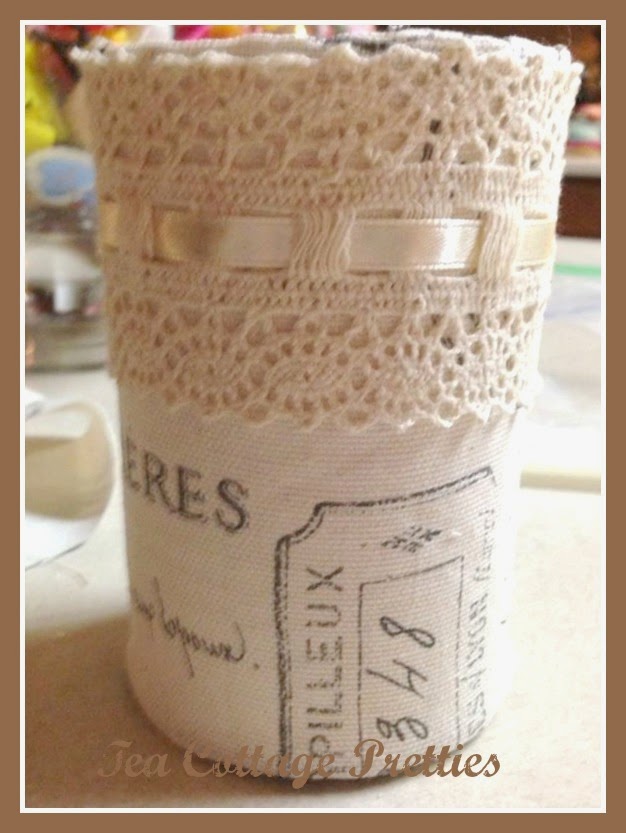
The last thing I made by hand was a toothbrush cup. 


I made it using a tin can (from canned corn),  I made sure that the edges were not sharp.  I cleaned it well and dried it.  Then I cut some fabric, got out my trusty scissors and my hot glue gun.  I glued the fabric on to the can.  Then I made a nice seam and folded the fabric over the bottom and the top.  I added a piece of crochet trim and just like that I had a matching toothbrush holder. 


You can see the rugs in this picture..


The rugs are super soft and I think they will appeal to just about anyone.  I do not like toilet rugs so I did not buy that kind of rug.  I choose one for in front of the bathtub and one for the sink.  I will show you the rest of my decor choices below...

  We had to fix a few places in the walls, ceiling and cover all the holes in the walls first.  We had to paint the walls so I decided to select a color that was close to what we already had on the walls.  I just wanted them to look clean and nice for others to see. 

After doing the repairs, I of course cleaned the bathroom really well.  I cleaned all the fixtures, inside cabinets and closets.  Once everything was cleaned up it was time for my favorite part - DECORATING.  

This particular bathroom is long and narrow so it is super hard to take photos but here are the before photos. I had already removed all the things off the walls so the bathroom is kind of  bare in these photos. 

BEFORE


AFTER


It is simple and clean with just a few special touches and one art piece on the wall.  Most of my decor items came from around our home.  I love shopping in my own home and reusing things in a different way.  


Cost For Decor Items

Shower Curtain       $17.00   Amazon
Towels                       $10.00  Walmart
 Rugs                           $24.00  Walmart
  Crochet Trim                $4.00  Walmart
        Wall Art                       $3.00  Hobby Lobby
Burlap Trim                $4.00 Walmart
Decorations                                Free      

  Total                         $57.00                       

Cost For DIY Items

Paint $18.00
Caulk $6.00
Wall Putty $4.00

Total $28.00


So this bathroom update cost a total of $85.00


I think it was well worth the price.  I am super pleased with our bathroom redo. I want to thank my son for painting the walls for me, his help was greatly appreciated. 


This bathroom may not sell our home but it certainly won't keep anyone from buying it 

One room down and HOW MANY TO GO???


Till next time, 


Beverly


Tea Cottage Pretties

Tuesday, March 18, 2014

PINTEREST AND SPAM

Pinterest And Spam


Everyday we have the opportunity to learn something new.  Sometimes we learn something good and sometimes we learn something not so good.  Either way every thing we learn is useful and we can gain much for our new knowledge.  I have been on Pinterest for a long time and as with all things, it is a learning experience.  This week I learned that if you have a really popular Pin that others are out there to take advantage of that Pin.  I have a vintage dress that I Pinned that has become quite popular and the spammers found it.  I gave it some thought and decided that it was just wrong to use the image, which belongs to the seller of this particular dress, to place spam ads in the comments.  So I decided at first to just delete the comments but the comments kept coming.  Then I decided to delete the comment and block the Pinner so they could not place any more spam ads.  The next day there were more spam ads by a different user but for the same dress shop.  Apparently this is a dress shop that makes vintage styled dresses.  I then decided to place a comment myself asking that Pinners please respect the seller's image by not placing spam ads and letting them know that I will report them and block them. 

Now I will need to monitor comments on my Pinterest to insure that others are not using my Pins for spam.  I feel it is important to respect the integrity of the Pins and their respective owners.  It is the least I can do...


What are your thoughts on spamming on Pinterest and have you had any experience with spammers?  

And here is the Pin to the beautiful dress.  
You can find it in the seller's Etsy shop


I do love my Pinterest,

Beverly

Tea Cottage Pretties

UPDATE:  Everyday it is a new user placing the same spam ads for the same shop.  Apparently they set up new Pinterest Accounts, Pin a bunch of their dresses and then spam vintage dresses.  This is a dress shop in Hong Kong. How unfortunate that they think this is okay to do or maybe they know it is wrong and just do not care.  

Monday, March 17, 2014

A POST TO SAY HELLO

A Post To Say Hello

Me in my faux fur coat I purchased last year for $5.00. 

I have been a very busy girl these last few weeks so I wanted to stop by my blog and say hello.  I am working on a few new post and I hope to have one ready very soon.  I have a post that I am working on featuring my antique chest/trunk.  
We are also working on getting our house ready to sell which means tons of cleaning out and getting rid of 10 years worth of stuff.  My current project is our upstairs bathroom.   I am trying to neutralize our home just a bit and clear tons of clutter and I am doing it on a very small budget.  I will share my bathroom redo with you here on my blog.  
Until then here are my new towels for the bathroom.


I purchased some inexpensive towels by Better Homes and Gardens and I added the crochet and ribbon trim.  The towels and washcloth cost $10.00 and the trim was $3.00.  

 I love how they turned out.  

So see you very soon!

Have a beautiful week,

Beverly

Tea Cottage Pretties

Sunday, March 2, 2014

A PRETTY TEA TOWEL AND A NEW BUTTON BRACELET

A Pretty Tea Towel 
And 
A New Button Bracelet


After going thrift shopping last weekend I decided to check out another thrift shop here in town this weekend.  There was so much to look at that we just could not go through everything.  This particular shop does not put things together by size and that was frustrating.  So we ended up only buying one little thing but I really like what I did find.  I found a tea towel that was made to commemorate the marriage of William and Catherine.  It was in perfect condition (just needed a good washing) and I had to bring it home with me, here is my tea towel. 


I always find myself wondering when I find things how they ended up here and at the thrift shop.  Although I am really tickled it found it's way into my hands.  I love tea as you probably know by now and this just suits me to a tea :).   So even though I did not find that most fabulous of finds, I am ever so happy with my new tea towel.  I think I might have to make a wall hanging out of it and it will probably never be used while serving tea.  

Looking at my bracelets this weekend I decided I need a bracelet with black in it.  So I thought why not make one in black and white out of buttons.  You know where this is going right?  So off to Hobby Lobby I went to see what buttons they had that I could make into a new bracelet, look what I found. 


To see how I make my button bracelets visit this post on my Blog  -  Button Bracelet


The button bracelet was my only little project over the weekend but I really like how it turned out.  I love bracelets and here is part of my collection.  Do you think I have a few bracelets?  


I am also going to try a new product and I will follow up here on my blog to let you know if I feel it works.  

Have you heard of the Downy Unstopables? 

BTW unstoppable is spelled incorrectly, just saying.
I want to see if it really last 12 weeks.  
Have you tried it yet?
Love to hear from you, leave a comment below.


Hope everyone has a beautiful week and thank you ever so kindly for visiting me. 


Hugs, 

Beverly

Tuesday, February 25, 2014

THE BEVERLY HANDBAG TUTORIAL

The Beverly Handbag Tutorial


Recently I shared this handbag with you on my blog. Today I am going to show you how to make the bag itself. I did not use a pattern when I made this bag, instead I just made it up as I went along.  So I made another bag in this style so that I could make a tutorial for you. Although I am not great at Tutorials, I do hope you enjoy.   I did not make the new one a collage bag because  I wanted to focus on the bag itself.  Here is the new handbag. 


To make this bag you will cut 8 pieces of fabric.  Here are the pieces and the sizes of each piece. 


Total of 8 Pieces
2 Pieces outside of bag 17.5 X 13.5 Inches
2 Pieces for inside of bag 17.5 X 13.5
2 Pieces for the handles 2.5 X 24.5 Inches
1 Piece for the pocket inside 10.5 X 7.5 Inches
1 Piece for Zipper Pocket (If desired) Size can vary depending on your zipper but I used  8 X 10 Inches

If you prefer to make your bag sturdy you can use fusible webbing to reinforce it.  

First I worked on the handles for the bag.  I simply stitched down each side and flip the tube right side out.  Then I ironed them and added the crochet trim I had picked.  I cut the handles to fit the trim.  


Then I worked on the pocket for the inside lining.  I iron the sides and bottom and then stitched around them.  I added my trim to the top side after using a zigzag stitch to keep it from unraveling.  You can simply fold it over and stitch it if you are not using any trim.  I stitched a line down the center to make two areas for my smart phone and iPod.  Then I sat this piece aside. 


Next I went to work on a zipper pocket.  This step is not necessary unless you just prefer a zipper pocket.  I am terrible with zippers so I have adopted a super easy zipper process.  I some really cute zippers that are decorative so that I do not have to hide them.  I simply stitch them on.  Cut the slit open and zigzag the fabric  Then I sew a piece of fabric behind the zipper and just like that I have a super easy zipper pocket.  Note: you can easily decorate the ends of the zipper by adding flowers, etc. 


Now it was time to work on the bag.  I stitched a zigzag stitch around all the remaining pieces.  This reinforces it and keeps the edges from unraveling.  Then I assembled all the pieces.  First the handles, placing them 7 inches apart and 3 1/4 Inches from the ends. Make sure that you attach them front side facing the outside fabric for the handbag.  Caution make sure the TOP of your pockets and Zipper are facing Up so that when you flip the fabric they are not upside down.  I have done this before and no one loves the seam ripper.  LOL  Do this for both sides. 


Then place the front side of the inside fabric faced down over the handles, like this:


Then stitch across the top of each side.  You will now have something that looks like this. 


Now it is time to put the bag together.  Open up your pieces and lay them flat.  Place right sides together and pin all the way around.  Be sure not to get your handle caught in any of the edges.  Then stitch all the way around except for an opening on bottom of the side with the inside lining pieces  This will be used to flip the bag right side out. 


Double check the bag to make sure all your  pieces are in the correct place then measure 2 X 2 inch sections on each corner and cut them out.  This will make the bottom for your bag. 


Once you have cut them out take each corner and pin it and stitch. Be sure to line up the seams along the bottom and sides of the bag.  It should look like this, although this wasn't my neatest work here.   


Then flip the bag...


It should now look like this:


I like to stitch around the top of the bag 1/4 inch from the edge.  This gives the bag a more professional look and add strength to it. 

You can leave it like this if you choose  It is a great bag this way but I like to pleat the ends. To do this simply fold half way to the handle from the center seams on both sides.  I did not take a very good photo of this step for you but here is what I do have.  I of course pinned it better before I stitched over the pleats. 


I think this photo makes it clearer. I pulled on it so you could see what I was doing. 


When the ends are pleated, your bag will look like this. 
Isn't it cute so far!


Again you could probably stop here but you know this girl had to add more.  So next I added my crochet trim around the bag.  I put the seam for the trim on the front center because I will cover it with a big flower to make the closure for the bag.  Note: that you could have added the trim earlier but I choose to wait to make sure I wanted the trim on the bag when I saw it all together.  Sometimes it is hard to know prior to building your bag.  I do love the trim and my bag is coming along. 


Now you have to decide if you want the handles flat (as they are) or if you want to round them.  If you do want them rounded there are two ways you can do this.  One is to simply stitched the edges together and the other requires placing cording inside and stitching the edges together.  I personally like rounded without the cording.  The cording makes the handle firm and since I have Fibro I prefer a softer touch so I left it out.  Here is how you stitch it...

Slip Stitch
(The heart fabric you see is my nightgown) 


Once that is done it is time to HAVE FUN by adding all the cool stuff.  First I added a big flower, then a bow and other things.  Here is my new bag!!!


The long ribbon you see is attached to the inside back of the bag.  To close your bag wrap the ribbon around the big flower.  


Once you are happy with your bag and finished be sure to stitch up the inside lining where you left the opening to flip the bag right side out.  You can if you choose add something in the bottom (plastic, cardboard, etc.) to make it firm but I like my bag floppy.  


What do you think?


You are welcome to share this tutorial but I do ask that you please give me a link back.  This was a very time consuming project and I am super happy to share.   I am sure there are probably bags out there similar to this one but I assure you I designed this bag on my own based on my knowledge of making handbags.   I did not use any resources online what so ever, so I am naming this The Beverly Bag.  I so hope you enjoy my tutorial and if so please leave me a comment and share your bag with me.   I would SO love to see others 

NOTE:  This bag can be made taller by simply adding inches to the width of the fabric.   I like this size as it is perfect for me. 

I am so glad you stopped by today and happy sewing,

Beverly

Tea Cottage Pretties

My Handbag was featured at


LinkWithin

You might also like: